

Wild zone 11 in Pokémon Legends Z-A: what the encounter space actually is
Wild zone 11 in Pokémon Legends Z-A is one of the named wild encounter areas that frame the Lumiose City overworld. The zone sits in a tighter, partially enclosed corner of the city, which is unusual compared with the open plazas and boulevards that define many of the other wild zones. That single layout decision changes how players approach it, how the encounter table is balanced, and how the real-time battle system reacts to line-of-sight and elevation. Anyone studying wild zone 11 legends za as a design case gets a useful look at how Game Freak reuses the core Pokémon battle formula inside a constrained environment, with the trade-offs that follow from wall placement, traffic routing, and spawn density.
For a player, the zone reads as a compact challenge run: enter, manage your party, handle whatever shows up, and extract. For a developer or technical artist, the same space shows how level design, encounter data, and battle logic cooperate to create difficulty without inflating the level curve. The rest of this guide treats the zone as a small but representative piece of the Pokémon Legends Z-A real-time system, with enough detail to be useful both to players planning a route and to readers who want to understand the engineering decisions behind it.
Where wild zone 11 sits in the Lumiose City layout
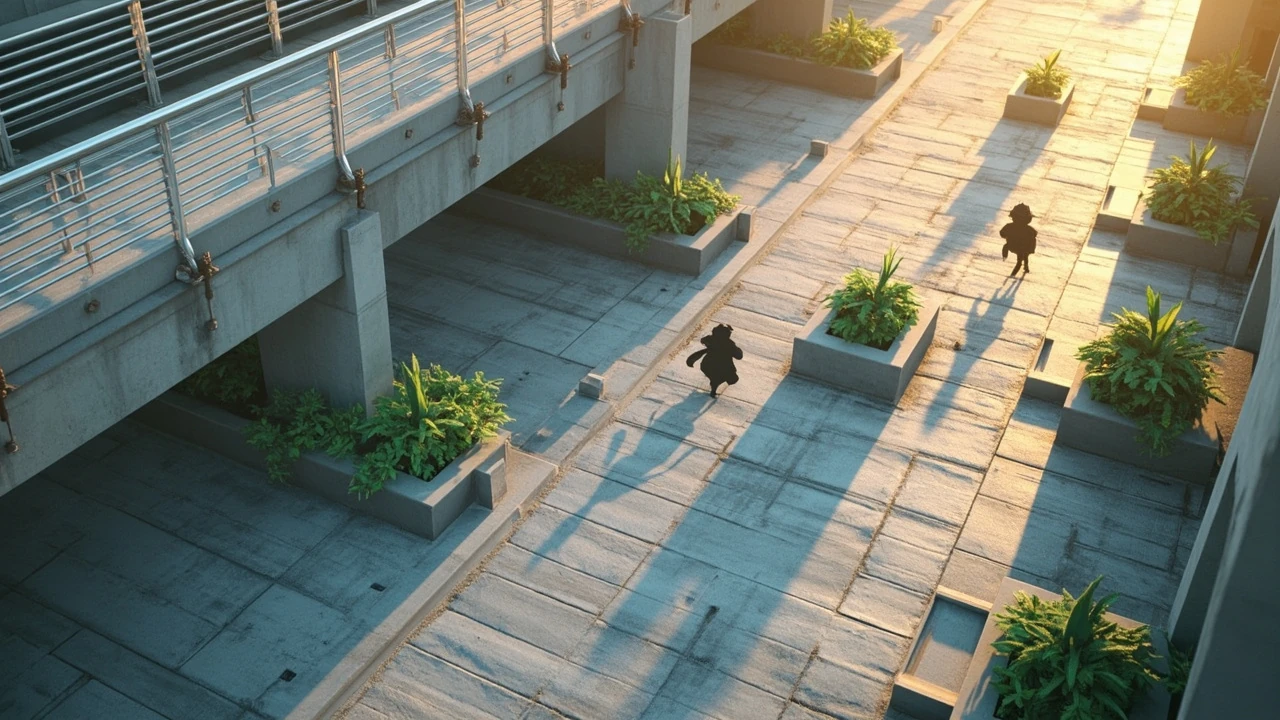
The official maps describe Lumiose City as a roughly circular urban area divided into numbered sectors and a ring of wild zones around the perimeter. Wild zone 11 occupies a position on that ring that leans toward enclosed streets, partially walled courtyards, and an elevated roadway that doubles as a navigation landmark. Most wild zones in Pokémon Legends Z-A feel like open parks, open riversides, or open industrial lots. Wild zone 11 does not. It feels like a city block that happens to host wild encounters, and that single impression drives most of the design discussion below.
From a level design perspective, the area is built from a small set of modular pieces that Game Freak has used elsewhere in the city:
- Short stone walls that block movement but allow ranged moves to pass over them.
- Lowered planters that function as soft cover and visual wayfinding for the player.
- Stair segments that link the street level to an overpass, allowing vertical movement without breaking the play space.
- Decorative props such as benches, lamp posts, and signage that double as collision and occlusion objects for the encounter system.
These pieces repeat across the city, but the specific arrangement in wild zone 11 produces a denser, more corridor-like reading than the average wild zone. Players who want to optimize their route quickly learn to use the overpass as a way to scout what is below before committing to a fight. The view from the top of the stairs also exposes the spawn distribution in a way that the ground-level camera does not, which is one reason experienced players tend to pause at the top of the stair segment before continuing.
The street grid in the zone is intentionally narrow. A player walking the central lane will have at least one potential encounter within line-of-sight for most of the route, and the overpass acts as a vertical divider that splits the area into two roughly equal halves. That divider is the single most important piece of geometry in the zone, because it determines where the player can retreat, where the encounter system spawns the Alpha, and which sightlines the player can use to break aggro.
How the encounter system drives wild zone 11 legends za difficulty
Pokémon Legends Z-A runs on the same underlying creature-battle logic that the main series has used for years: stats, types, abilities, and turn-by-turn resolution. What makes the Legends subseries feel different is that battles unfold in real time, on the same map where the encounter started, rather than in a separate battle screen. Wild zone 11 is a good case study in how that real-time system constrains both players and the encounter table, because the compressed space exposes the constraints quickly.
Three systems matter when you approach a wild zone in this game:
- Spawning: a deterministic encounter table for the zone, with weightings influenced by the time of day and the player’s current story progress.
- Detection: an awareness radius around the player that triggers either a passive reaction or an aggressive chase, depending on the species and the player’s relative level.
- Battle resolution: the real-time command interface, where action timing, command queuing, and ability activations replace menu selection between turns.
Because the zone is enclosed, the spawning layer has less room to spread out. A typical approach across the wider wild zones gives the player a 40 to 60 second walk between distinct encounter groups. In wild zone 11 that interval shrinks, which means the player has fewer quiet windows to heal, reposition, or swap party members. The game compensates with a slightly lower average level range for non-boss encounters and a heavier emphasis on species that have utility against the corridor-shaped terrain.
The detection radius behaves differently here than in the riverside zones. In open terrain, a player can break line-of-sight by moving around a tree or a large rock. In wild zone 11, most of the cover is low: planters, benches, and the small wall segments around the stair entries. That means the player’s detection radius extends further relative to the available cover, and the encounter system is more likely to chain multiple groups together. A player who understands that chain behavior can use the overpass to reset it. A player who does not will eat three or four encounters in a row without a clean break.
Encounter table and level range for the zone
The exact encounter table is set by the live game data, and any list published before the official release is best treated as provisional. From what is publicly known, the zone is tuned to give mid-game players a fair challenge without crossing into the post-game range that defines the late-story zones. The mix emphasizes species that benefit from verticality, such as Flying and Psychic types, alongside a smaller presence of bulky ground-dwellers that hide in the planter areas. The choice is not accidental: the encounter table mirrors the geometry, so the player cannot easily cheese the zone by camping in a single corner.
| Encounter role | Common species | Approximate level range | Terrain behavior |
|---|---|---|---|
| Overpass flyers | Bird and Bat-line species | Mid-twenties | Patrol the overpass; dive when the player walks below |
| Street roamers | Mixed types, often dual-typed | Mid to high-twenties | Use the streets as patrol loops, react to player movement |
| Planter hiders | Ground, Bug, and Poison species | Low to mid-twenties | Remain stationary until the player crosses a line-of-sight threshold |
| Alpha signature | A larger, type-specific Alpha | Tuned above the regular cap | Owns a fixed corner of the zone; high threat, high reward |
The Alpha signature deserves attention from a design perspective. Wild zones in Pokémon Legends Z-A each have a flagship Alpha encounter that occupies a known spot in the map. In wild zone 11, the Alpha is placed near the underpass, which is a deliberate choice. The underpass is the only place in the zone where a player cannot simply circle away at speed: it is a single corridor with two exits, and the Alpha’s facing direction encourages players to either commit to the fight or back out before line-of-sight is established. That single placement does most of the work of making the zone feel dangerous, and it explains why so many players report the Alpha as the single hardest fight in the mid-game.
It is also worth noting that the level numbers in the table above are launch-state values. The live game has been patched at least once since release, and the encounter table is the most likely candidate for a rebalance. If a player is reading this guide a year or more after launch, the safest move is to check the in-game map markers, which display the recommended level range for the current data.
Recommended preparation before entering the zone
Because the zone is compact, preparation matters more than raw team power. A team that is over-leveled for the encounter table will still struggle if it cannot handle the real-time action loop cleanly. Before entering, players should keep three things in mind:
- Party composition: bring at least one ranged or Flying-type counter for the overpass flyers, and at least one defensive or status-capable Pokémon for the Alpha encounter.
- Inventory: healing items in the Legends games are limited per rest, so stock up before entry rather than after a partial clear.
- Route planning: decide whether the player is going to clear the zone in a single pass or split the run into an overpass sweep and a street sweep, since the encounter groups do not all respawn at the same rate.
A useful pre-flight check before walking in is to look at the player’s current quest log. Several side quests in Pokémon Legends Z-A send the player into a specific wild zone to interact with a particular species. If the player is in wild zone 11 for a quest rather than for general progression, the priority changes from clearing every encounter to reaching and resolving a single target without spending too many resources on the way. That distinction matters, because the encounter system does not know the difference between a questing player and a grinding player, and it will treat both the same way.
Inventory management deserves a separate paragraph. The healing economy in Pokémon Legends Z-A is more constrained than in the mainline games: a single rest at a bench or a fast-travel point refills a fixed number of items, and the player cannot simply spam potions during a long encounter chain. The right move before entering wild zone 11 is to spend down the inventory to a known baseline, then refill to the cap at the nearest rest point, so the player knows exactly what they are walking in with. Anything more elaborate than that, such as crafting specific berries for status recovery, is a fine optimization but is not required for a clean run.
How the real-time battle loop reads inside a constrained space
For readers who are coming to Pokémon Legends Z-A from the main series, the most disorienting change is the removal of a separate battle screen. Battles occur in the overworld, with the player issuing commands to their active Pokémon through a radial-style menu that can be opened while the creature is moving. This is the same general approach used in the Pokémon Legends line of games, and it is what makes the layout of a zone such as wild zone 11 so important. The geometry of the zone is not decoration; it is part of the combat math.
Three concrete consequences follow from that design:
- Line-of-sight to a wild Pokémon becomes the trigger for engagement, not a random encounter roll. Players can plan around corners and elevation.
- Switching the active Pokémon is more expensive than in mainline games, so the player benefits from a smaller, more focused party rather than a wide roster.
- Status effects, weather, and terrain features interact with the same real-time space, so a well-placed wall can become a defensive tool for both the player and the opponent.
For a developer reading the game as a design artifact, the wild zones in Pokémon Legends Z-A function as level design tutorials disguised as content. Each one demonstrates a different way that the real-time battle system can be tuned, and wild zone 11 is the lesson in compression: how much difficulty you can build into a small, enclosed space without changing the underlying battle math. The lesson is transferable to other genres, which is why this particular zone shows up so often in design postmortems.
There is also a subtle audio design element at work. The encounter calls in wild zone 11 are mixed louder than in the riverside zones, which is a deliberate choice to compensate for the dense geometry. In an open field, a player can see an encounter before hearing it. In a corridor, the player often hears it first, and the audio mix has to give the player enough lead time to either commit or retreat. That kind of detail is easy to miss in a casual playthrough and is the kind of thing that becomes obvious once the player has died to the same overpass dive chain three times in a row.
Common failure modes inside the zone
Most failed runs in wild zone 11 come from one of a small set of mistakes. They are useful to know because they reveal how the system responds to player behavior, and because the same patterns repeat across the other numbered wild zones in the game.
| Failure mode | What the player did | What the system did | Better response |
|---|---|---|---|
| Overpass dive chain | Ran straight under the overpass | Multiple flyers chained aggro | Use the overpass to thin flyers before descending |
| Planter ambush | Walked through the planter area without scouting | Hiders triggered on proximity | Approach planters from the side, not the opening |
| Alpha early pull | Engaged the underpass Alpha at low HP | Alpha used a priority move to lock the player out | Rest before entering the underpass, consider a status opener |
| Resource drain | Fought every encounter in one pass | Inventory emptied before the Alpha fight | Skip the lower-value encounters, focus on the Alpha |
| Overpass fall | Walked too close to the railing while fighting | Knockback pushed the player off the edge | Keep at least one tile of clearance from the railing during aerial fights |
| Switch mid-action | Tried to swap party members during a chain | Switch command locked out by the action queue | Plan switches at safe nodes, not in the middle of an engagement |
The pattern in every row is the same: the zone punishes the player for treating it like an open wild zone, and rewards the player who reads the architecture. That is the part of wild zone 11 legends za that is genuinely interesting to study, because the same trap exists in many open-world game spaces where the level design implies more freedom than the encounter system can support. The cure in every case is the same: treat the space as a small arena with a fixed set of nodes, and plan the route between those nodes before engaging anything.
How the zone compares with other wild zones in the game
Pokémon Legends Z-A distributes its wild zones around the perimeter of Lumiose City, and each one has its own character. A short comparison helps place wild zone 11 in context, and gives the player a sense of which zone to use for which purpose during the mid-game.
| Zone character | Typical feel | Player benefit | Player cost |
|---|---|---|---|
| Open riverside zones | Wide, calm, scenic | Easy leveling, lots of escape routes | Less efficient XP per minute |
| Industrial lots | Mid-size, mixed terrain | Varied encounter table | Moderate resource pressure |
| Wild zone 11 | Compact, partially enclosed | High encounter density, signature Alpha | Tight resource economy, limited retreat options |
| Late-story zones | Open but high level | Best XP and item yield | Requires a polished team to survive at all |
Players who want to optimize their time tend to bounce between the riverside zones and wild zone 11 during the mid-game. The riverside zones are where the player trains the team. Wild zone 11 is where the player stress-tests the team before moving into the late-story zones. Treating it as anything else leads to the failure modes listed above, and the difference between a smooth mid-game and a frustrating one is usually a matter of whether the player learned that lesson before the late-story zones started asking the same questions at a higher level.
It is also worth noting that the encounter density in wild zone 11 is high enough to make it a useful source of specific items that are otherwise annoying to farm. Several crafting materials in Pokémon Legends Z-A drop from species that prefer enclosed terrain, and wild zone 11 is one of the more reliable places to grind them. A player who needs a stack of a particular material can clear the zone two or three times in a session and come out with more than they would get from a full lap of the riverside.
Why the zone is a useful case study for level design readers
For readers who care about game development rather than the Pokémon meta specifically, wild zone 11 is a compact example of three design ideas that show up across open-world and semi-open-world games:
- Density without confusion: a small space can hold many encounters without becoming unreadable, as long as the level layout uses walls, elevation, and sightlines to break the space into readable chunks.
- Architectural difficulty: the encounter system does not have to scale the level curve to make a zone harder. Repositioning the Alpha encounter at a chokepoint does the same work with less numerical inflation.
- Resource pressure as a difficulty multiplier: a constrained healing economy turns ordinary fights into real decisions, even when the level numbers stay the same.
None of those ideas are unique to Pokémon Legends Z-A, but the game makes them unusually visible because the underlying battle system is familiar. A reader who already knows how the turn-based mainline series feels can isolate the differences that come specifically from the real-time loop and the level design. That is the value of paying attention to a single, well-defined encounter area such as wild zone 11 legends za rather than treating the whole open world as one undifferentiated design surface.
For a working level designer, the most useful takeaway is that the zone’s difficulty budget is mostly spent on geometry rather than stats. A new designer reading the encounter table might assume that the Alpha is hard because it is over-leveled. In practice, the Alpha is hard because the underpass geometry removes the player’s retreat options, and the level numbers are tuned to match that constraint rather than to drive it. That distinction matters when designing similar spaces in other games, because it points at a design lever that does not require touching the underlying combat math.
There is also a lesson in how the audio and visual design cooperate with the geometry. The overpass flyers are visually loud and audibly loud, which is the right call for an encounter role that the player is supposed to be able to plan around. The planter hiders are visually quiet and audibly quiet, which is the right call for an encounter role that is supposed to punish inattentive play. The Alpha sits in between, with a clear visual signature but a quieter audio cue, so the player has time to register the threat before committing. None of those choices are accidental, and they are the kind of detail that shows up in a design document if the team bothered to write one.
Limits of this guide and what would change it
Everything in this article is built from publicly available information about the game, the structure of its wild zones, and the real-time battle system that defines the Pokémon Legends subseries. The exact encounter table, the specific Alpha species, the precise level numbers, and the in-game economy of healing items can change with patches and updates. If the developer ships a balance pass that shifts spawn weights or moves the Alpha encounter, the recommendations above will need to be read against the new state of the game rather than the launch state.
The safest way to keep this guide honest is to treat it as a description of how wild zone 11 fits into the game’s design, not as a live walkthrough. For a player heading into the zone tonight, the best move is the same as for any constrained open-world space: scout from a vantage point, commit to one route through, and save the heaviest resources for the chokepoint fight at the end. For a designer reading it as a case study, the value is in the structure of the analysis rather than the specific numbers, and the structure should hold up even if the numbers move.
One last caveat. The game has not been out long enough to know whether the encounter table is stable across all platforms, or whether the parity patches between the Switch version and any later releases will change the spawn distribution. If a player is reading this guide on a platform that launched later than the original, the safest move is to treat the encounter table as a starting point and confirm against the in-game map markers before committing to a route.
Frequently asked questions
What level should my party be before I enter wild zone 11?
The zone is tuned for a mid-game party that is around the mid-twenties in level. Being slightly above that range is fine, since the real-time battle system forgives over-leveling more than it forgives poor positioning. Being below the range usually leads to a quick knockout against the Alpha encounter, especially if the player tries to brute-force the underpass fight without a status strategy.
Where is wild zone 11 on the Lumiose City map?
Wild zone 11 sits on the perimeter ring of named wild zones that surrounds the central city. Its signature feature is a short overpass that crosses a narrow street and an underpass that connects to a larger neighboring block. For exact coordinates, the in-game map shows the entrance marker once the player has unlocked the corresponding story or side quest.
Does wild zone 11 have an Alpha Pokémon?
Yes. Every numbered wild zone in Pokémon Legends Z-A has a flagship Alpha that occupies a fixed location and behaves as the local boss. In wild zone 11, the Alpha holds the underpass and uses the geometry of that space to limit the player’s retreat options. The exact species is set by the current game data and can shift with patches.
What is the best team composition for the zone?
A focused party of three Pokémon that covers Flying, Psychic, and a sturdy defensive type handles most of the encounter table. Bringing a status-capable Pokémon such as a sleep or paralysis user makes the Alpha fight dramatically easier, because status effects interact cleanly with the real-time command loop and let the player reset positioning between turns.
How do I avoid the overpass dive chain?
Walk along the overpass first and engage the flyers from above, or skirt the wall on the side opposite the planters until the flyers lose interest. The key is to avoid running straight under the overpass, because the geometry is what makes the dive chain possible. Once the flyers are thinned, the rest of the zone reads more like a normal mid-game wild zone.
Are there any unique items in wild zone 11?
The zone drops the standard item economy you find in other wild zones, with occasional rare crafting materials tied to specific species. The most reliable source of value is the Alpha encounter itself, which is tuned to reward the player for the risk of taking it on at the underpass. Treat any specific item list as provisional, since the live data can change.
Can I leave the zone mid-fight and come back?
Yes. The game allows the player to retreat from the overworld at any point, and the encounter state resets when the player re-enters. The cost is travel time and any items used during the retreat, since the inventory is shared across the run. Players who are stretched thin on healing items often find it more efficient to fast-travel out, rest, and come back than to try to clear the zone in one pass.
Is wild zone 11 good for XP grinding?
It is good for efficient XP if the player can manage the encounter density without burning through healing items. The riverside zones are still better for relaxed, low-risk leveling, because they have more breathing room between encounters. Wild zone 11 is better treated as a stress test of a party that is already approaching the level cap for the mid-game.
How does wild zone 11 fit into the story progression?
Wild zone 11 becomes relevant during the mid-game chapters of Pokémon Legends Z-A, when the player is asked to investigate a series of wild zones around the city. The exact story beats depend on the current state of the campaign, and the game tends to gate the higher-numbered zones behind specific story triggers rather than raw level.
What changes about the zone in the post-game?
Post-game patches and updates often raise the level range of older wild zones and rotate the encounter tables to give returning players something new to do. If wild zone 11 has been rebalanced for the post-game, treat the encounter numbers in this guide as launch-state values and re-check the in-game markers before committing to a route. The level design lessons above still apply, but the math behind them may have shifted.




Leave a Reply