

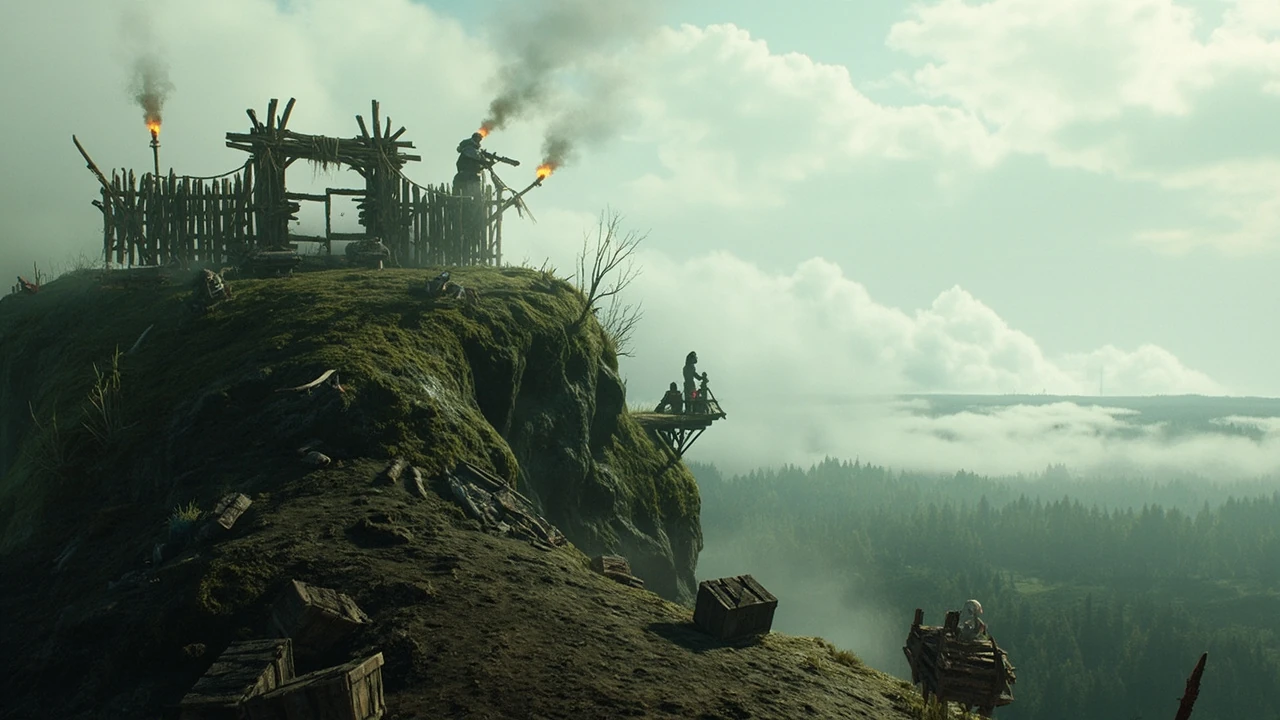
Goblin camp BG3: quests, NPCs, and combat walkthrough
The goblin camp in Baldur’s Gate 3 sits on the bluffs above the Blighted Village and acts as one of Act 1’s three converging quest hubs. Almost every party passes through it because the goblin leaders hold the only stable path to the druid grove’s rival faction, control several companion stories, and gate two of the three possible resolutions for the grove conflict. Knowing the layout, the named NPCs, and the consequences of each ritual path is what turns a messy goblin camp BG3 run into a deliberate choice rather than a checklist of fireballs.
This guide treats the goblin camp as a quest and design space rather than as a single dungeon. It explains how to reach it safely, who actually runs the camp, how the three ritual paths differ mechanically, which encounters reward the most XP and loot, and how a developer’s eye can read the encounter design that Larian Studios used to push early players toward tactical thinking. It also flags the version-sensitive edges where patch notes have changed outcomes, because the goblin camp BG3 questline is one of the most patched parts of the early game.
What the goblin camp is in BG3’s Act 1
The goblin camp is the main base of the Absolute’s goblinoid forces in Act 1. It serves as a political, social, and combat location rolled into one. In design terms, it functions as a quest hub that the player approaches after the Blighted Village fight and before the mountain pass, with most side content in the camp gated by reputation with the three goblin leaders: Dror Ragzlin, Minthara, and the True Soul leader for the region.
What makes the goblin camp BG3 interesting from a level design perspective is that the player’s intended path usually involves fighting goblins, yet the camp gives a fully functional alternative: the player can talk their way in, gain standing, and choose to raid the druid grove on the goblins’ behalf. The same space supports two very different quest arcs without feeling artificial, because the camp’s NPCs are written to react to party composition, race, and class.
The camp’s footprint is also larger than most first-time players expect. It is split into an outer courtyard, a throne area, a back-line temple, a prisoner pit, and a raiders’ camp at the cliff edge. Each section has its own NPC economy, its own loot table, and its own dialogue triggers. Treating the camp as a single arena is the most common cause of an unfinished Act 1, because several quest rewards only register if the player walks the perimeter at least once before starting any of the three rituals.
How to reach the goblin camp without softening the early game
Reaching the goblin camp is short and linear once the Blighted Village is cleared. The path matters because careless movement into the camp’s outer ring can trigger two fights at once.
- Fast travel to the Blighted Village waypoint after defeating the ogres outside the goblin shrine.
- Cross the broken bridge to the east of the village and follow the marked path up the bluff.
- Approach the wooden palisade gate where a goblin scout named Kant or a sentry group asks for a password or a bribe.
- Pass through the gate into the central courtyard, which opens into the throne area and the temple beyond.
Two common mistakes cause early wipes. The first is charging the outer sentries before the party has a clear line to the camp’s interior, which draws a reinforcement group from the watchtower. The second is saving the goblin camp fight for the end of Act 1, because by then the camp’s relative difficulty has fallen off and the player loses the design feedback that the encounter was meant to provide.
A third, less obvious mistake is approaching the gate in stealth without a backup plan. The goblin sentries detect a solo rogue on a failed check, and a partial detection usually locks the party out of the deception dialogue that opens the rest of the camp. The reliable pattern is to send a single character forward for the dialogue, keep the rest of the party in the treeline, and only advance once the sentries have waved the scout through.
Major NPCs and what each one controls
The goblin camp is not a single boss arena. It is a small court with three named leaders, a True Soul patron who visits, and a handful of sub-characters whose dialogue ties back to companion personal quests. Knowing who controls which lever is the difference between finishing the camp in a single sit-down and accidentally locking out a companion’s Act 1 resolution.
The three ritual leaders: Dror Ragzlin, Minthara, and Priestess Gut
| Leader | Role in the camp | Key dialogue check | What choosing them unlocks |
|---|---|---|---|
| Dror Ragzlin | Self-styled warlord of the camp, controls the warrior goblins and the arena | Intimidation or strength-based persuasion | The arena fight, the spiked club weapon, and a path that satisfies the warrior goblin faction |
| Minthara | True Soul drow paladin, military commander, oversees the raid plan | Deception or drow-specific dialogue, plus a sealed letter as proof | The raid on the druid grove from the goblin side, the earring reward, and a path to recruit Minthara later |
| Priestess Gut | Goblin priestess of the Absolute, runs the inner temple and the ritual of the dead | Religion or performance checks inside the temple | The death shepherd ability, the blood sacrifice questline, and the path to the Underdark via the temple |
Each leader represents a different ritual pillar the player can complete. The goblin camp BG3 quest structure is unusual in that the player is allowed to finish all three rituals in one visit, but the dialogue branches assume a player who wants to play the camp as politics first and combat second. Skipping the dialogue and going straight for the throne fight is mechanically possible, but it closes the ritual dialogue and shifts the rewards from named items to generic loot, which is why most walkthroughs recommend talking to at least one leader before drawing steel.
There is also a soft fourth pillar in the form of the True Soul visitor, who only appears after the player has committed to one of the three rituals. This visitor is the camp’s narrative hinge: her dialogue reconciles the three ritual paths into a single Act 2 transition and decides which of the camp’s NPCs survive to the shadow curse lands.
Other NPCs worth tracking in the camp
Beyond the three leaders, several NPCs carry the real quest weight and are easy to miss on a focused run.
- Roah Moonglow, a half-tiefling trader hidden in the rafters, sells camp-appropriate loot and only opens her shop if the party is not openly hostile.
- Liam, an imprisoned dwarf, ties into Wulbren’s story and the iron flask from the ruined village well.
- Klagga, a hobgoblin quartermaster, holds the keys to the cage cells and the prisoner pit.
- Sazza, a goblin prisoner, is the link to the goblin shrine outside the village and to a small reward chain that includes a usable crossbow.
- Mirkon, Lakrissa, and the tiefling children, once freed from the camp, become tied to the grove’s quest outcomes.
- Arka, a goblin cook near the raiders’ camp, sells a few recipes and provides the only reliable source of camp-appropriate food buffs during the visit.
These characters are small individually, but they are the threads the goblin camp BG3 questline uses to pull side content back into the main path. Their placement is also a good example of how Larian builds side content with strong route dependencies: most of them are reachable only if the player explores the camp’s back rooms rather than heading straight for the throne.
The three ritual paths and how they actually differ
The goblin camp hosts three named rituals, one per leader, and each ritual represents a separate completion path for the Act 1 grove conflict. The player is not required to do all three, but a careful run can stack their rewards. The three paths are not equally difficult, either. Dror’s arena is the most predictable fight, Minthara’s raid is the most dialogue-heavy, and Gut’s temple is the most punishing on an under-levelled party.
Ritual of the warrior: Dror Ragzlin’s arena
Dror’s ritual centers on a public test of strength. The player can volunteer a party member, volunteer an NPC, or simply fight Dror in his throne room. The arena encounter is a fixed combat with three waves, two of which use the same NPC stat blocks the player will see later in the Underdark and in the shadow druid fight, which makes it a useful practice ground for action economy and crowd control.
For readers who work in or study game development, the goblin camp is a useful case study for a few specific design techniques. The first is layered quest state. The camp’s quest outcomes are not stored as a single flag. They are stored as a combination of reputation, ritual completion, and raid outcome, which is why a player can finish Act 1 in many different ways and still reach the same Act 2 opening. For a sense of how the broader game structures those openings, the Wikipedia entry for Baldur’s Gate 3 offers a short reference.
From a combat design perspective, the arena is a textbook encounter for teaching area denial. The arena has three choke points, two elevation tiers, and a column layout that punishes players who cluster on a single corner. Melee-heavy parties have to manage the back-line archers, while ranged parties have to manage the war drums that the goblin shamans activate mid-fight. Whoever wins the arena earns Dror’s spiked club and a reputation token that opens the option to challenge Dror directly without the arena sequence.
There is a known patch edge to this ritual. In earlier versions of the game, the arena could be skipped entirely by intimidating Dror before his war drum speech. As of the current console and PC builds, that intimidation check is gated by a separate reputation flag, and failing it forces the player into the arena regardless of class. Players who remember the older shortcut should plan for the fight rather than assume the dialogue path still works.
Ritual of the drow: Minthara’s raid plan
Minthara’s ritual is the only one of the three that the player can complete by speaking rather than by fighting. The sealed letter from the goblin camp’s true patron, the drow True Soul who calls herself the Absolute’s voice, is the entry point. Once the player presents the letter or passes the deception check, Minthara shares the raid plan against the druid grove, and the goblin camp BG3 quest line splits into its morally loudest branch.
This branch is the one that most players either avoid on a first run or repeat on a second run. Mechanically, it closes off several companion approvals, removes the tiefling refugees from the grove’s outcome, and unlocks Minthara as a recruitable companion through a different personal quest path. It is also the only ritual where the player can betray the goblins mid-raid, which means the combat and dialogue outcomes are layered rather than linear.
The mid-raid betrayal has its own set of constraints. The player has to survive a coordinated counterattack from Minthara, two ogres, and a war shaman, and the resulting fight resets the camp’s reputation flags. A party that wants both the raid rewards and a clean grove ending usually does the raid on a disposable save, then reloads to a state that keeps Wyll’s companion quest intact.
Ritual of the dead: Priestess Gut’s inner temple
Gut’s ritual is the only path that touches the Underdark without requiring a long detour. Inside the inner temple, the player can desecrate a sacred relic, perform a sacrificial rite, or kill Gut directly. Each choice rewards a different combination of gold, a unique spell scroll, and a piece of equipment with a death-themed magical property.
From an encounter design angle, the temple is the camp’s most vertical space. Two floors, a stairwell, and a chokepoint at the ritual circle mean that a well-placed wall of fire or a hypnotic pattern can shut the entire encounter down. The temple is also where the player first meets the death shepherds, which is the design hint that this is the path tied to the necromancer companion’s personal story.
One of the more useful but easy-to-miss details in the temple is that the sacrificial rite is reversible only by a long rest inside the camp. A player who triggers the rite and then leaves for the grove without resting will lock Gut’s death shepherd ability into the camp’s permanent state, which affects a late Act 1 quest trigger tied to the necromancer’s personal quest.
Combat approach for the goblin camp fight
The goblin camp fight is technically optional, but most parties end up fighting through at least one wing of the camp. The encounter design is built around three structures: an open courtyard with ranged cover, a tight throne room with high ground, and a back-line temple with vertical separation.
| Camp area | Main threats | Useful party tools | Risk if rushed |
|---|---|---|---|
| Outer courtyard | Goblin archers, two shamans, a hobgoblin captain | Shatter or fireball on clustered archers, misty step to flank the captain | Reinforcements from the watchtower draw an extra two groups |
| Throne room | Dror Ragzlin, two warrior goblins, a war drum | Hold person on Dror, silence the drummer, push enemies off the high ledge | Dror uses a multi-target slam that can down a tank in one round |
| Inner temple | Priestess Gut, two death shepherds, a captive bugbear | Avoid sacred ground aura, focus the shepherds, use the chokepoint stairwell | Sacred ground heals enemies each turn, doubling the fight’s length |
The strongest single tip is to scout the throne room before the courtyard. The camp is designed so that whoever sits on the throne will hear combat from the courtyard, and Dror or Minthara will either come to help or use a war drum ability to buff the courtyard fight. A quick stealth check from a rogue or a calm emotions spell from a bard can prevent this join-up.
For Honour Mode parties, the join-up risk is severe enough that most dedicated runs open with a surprise round on the throne room and only then fall back to the courtyard. That sequencing inverts the natural path, but it also means the party never fights both wings at the same time, which is the single most common cause of a goblin camp BG3 Honour Mode wipe.
Loot and rewards worth picking up
Most of the goblin camp’s rewards are tied to dialogue outcomes rather than chests, which is a deliberate design choice. A player who clears the camp by force will find less loot than a player who clears it by talking, because the talking path keeps Roah’s shop open and keeps the ritual rewards on the table.
- Dror’s spiked club, a rare two-handed weapon with a chance to inflict bleeding on critical hits.
- The blood sacrifice amulet from Gut’s temple, which grants temporary HP on kill and is a strong early pick for melee builds.
- Minthara’s earring, a charm bonus item that scales into mid-game.
- Roah Moonglow’s trader inventory, which includes a ring of mind shielding and several uncommon scrolls that are otherwise gated behind the Underdark.
- Prisoner cage keys, which free the tiefling children and unlock a small XP reward chain that scales with how many prisoners are rescued.
- A stack of goblin repair kits behind the throne, useful for players planning to keep goblin-themed gear into Act 2.
Most of these rewards are repeatable only through save scumming or a new playthrough, which is one of the reasons a goblin camp BG3 run is worth planning rather than blasting through. The exception is the ring of mind shielding, which Roah restocks on a long rest inside the camp, so a patient player can buy two or three over a single visit.
How the goblin camp fits into the larger Act 1 design
From a level design and pacing perspective, the goblin camp is the third of three converging hubs in Act 1. The first is the druid grove, the second is the Blighted Village and the goblin shrine, and the third is the goblin camp. Larian’s choice to put the three hubs close together on the world map is intentional: it makes the Act 1 conflict feel like a small regional war rather than a linear dungeon.
The camp also acts as the player’s first sustained encounter with a non-humanoid faction. Up to this point, the bulk of combat has been against goblins in small groups, the ogres near the shrine, and the gnolls. The goblin camp escalates the design in two ways: it introduces shaman spellcasting as a real threat rather than a flavor mechanic, and it introduces leaders with both combat and dialogue states. That combination is the design lesson the camp is trying to teach before the Act 1 finale in the Underdark and the Act 2 transition to the shadow curse lands.
For a wider reading of how the cast shaped those supporting characters, the account of how Karlach’s actor was originally considered for smaller goblin roles before being cast as one of the game’s most recognizable companions is a useful counterpoint to the goblin camp BG3 discussion, and the PC Gamer interview with Samantha Béart captures that casting story in detail.
Common goblin camp BG3 mistakes and how to avoid them
Even experienced players slip on the goblin camp because it looks like a stock dungeon. The camp is actually a small social system, and the design punishes players who treat it as a pure combat puzzle.
- Killing the goblin sentries at the gate without first moving the party into the camp, which prevents the player from picking up Roah’s shop and the prisoner keys.
- Initiating the Dror fight before the temple, which closes Gut’s ritual dialogue and forces a combat-only resolution of the temple encounter.
- Recruiting Minthara without saving before the raid, because the raid wipes a large portion of the grove’s content and most players want to test it on a disposable save first.
- Forgetting to loot the rafters in the throne room, where the most valuable single piece of early gold is hidden in a chest behind Roah’s position.
- Attacking the war drums, which the camp’s combat system uses to scale enemy morale; destroying them triggers an immediate morale break that turns a tactical fight into a rout.
Most of these mistakes come from missing the camp’s dialogue triggers. A single short rest in the camp often resolves two or three of them at once, because several NPCs approach the party on a long rest and the player’s response opens or closes quest branches.
A related mistake is leaving the camp before the prisoner quest resolves. The prisoner chain is gated by a small timer that starts the moment the camp turns hostile, and a player who clears the throne room and then fast travels to the grove will usually find the tiefling children already dead on the return trip. A quick check of the cage area before leaving prevents that outcome.
How a developer reads the goblin camp encounter
The second is dialogue-driven encounter design. Most of the camp’s combat is gated by a check the player could have passed. The arena exists because Dror demands a public test. The temple fight exists because Gut demands a sacrifice. The raid is optional because Minthara’s dialogue assumes the player might say no. The combat is real, but the design rewards a player who treats it as a last resort rather than a default.
Third, the camp uses verticality and choke points to teach tactical play. The throne room, the temple, and the courtyard each demonstrate a different control technique, and the camp’s economy of encounters means the player usually sees all three in one visit. A designer looking at the goblin camp as a template will see how a single map can teach several unrelated combat lessons without ever feeling like a tutorial.
Finally, the camp is a good example of how companion questlines can be embedded into an unrelated location. Minthara’s recruit path, the death shepherd tie to the necromancer, and the goblin shrine tie to the Underdark all use the camp as a hub rather than a separate area. That approach saves on world space and creates a denser Act 1, but it also means the camp’s quests have to be designed so that missing one does not break the rest. In practice, Larian solves that constraint by giving every side thread at least one dialogue trigger inside the throne area, so a player who only visits the throne can still pick up the major companion hooks.
A second development lesson is how the camp scales its difficulty through AI tuning rather than stat blocks. The shaman casters in the courtyard and the temple share a stat block, but the temple shamans have a different target priority and a different spell selection, which makes the same enemy feel like a different fight. That kind of AI variance is cheaper to produce than a full stat redesign, and it is one of the reasons the goblin camp BG3 encounter design reads as layered rather than as a single reskinned arena.
Verifying your goblin camp run before you leave
Before leaving the camp and heading to Act 2, a short checklist helps make sure the player has not locked themselves out of a reward or a quest branch.
- Confirm the ritual outcomes for Dror, Minthara, and Gut match the intended Act 1 ending.
- Check that the prisoner cages are cleared and the tiefling children are safe, because their survival affects the grove’s epilogue.
- Open Roah’s shop if she is still hostile-free, and buy the ring of mind shielding before leaving.
- Long rest in the camp’s throne area to trigger any companion reactions that have not yet fired.
- Save the game in a separate slot so the next decision can be tried without losing the goblin camp’s rewards.
Each of these steps is small, but together they prevent the most common goblin camp BG3 regret, which is realizing two acts later that a single missed dialogue closed off a companion quest.
Why the goblin camp still holds up in repeat playthroughs
The goblin camp is one of the few Act 1 areas that scales gracefully with the player’s experience. On a first run, it is a small social puzzle with several ritual paths. On a second run, it is a test bed for specific builds, because the camp’s enemy roster includes enough shamans, archers, and warrior goblins to exercise almost any class. On a third or fourth run, it becomes a design study, because the player starts to see how Larian layered the camp’s dialogue and combat to support several very different playstyles at once.
That staying power is also why the goblin camp BG3 discussion is still active years after the game’s release. Players who finished the game once come back to the camp to test Minthara’s path, the grove raid, or the temple’s death-themed quest. Designers come back to it to study how a small location can carry a large quest load. Both audiences get something useful from the camp, and the layered design is what keeps the discussion focused on mechanics rather than on a single canonical route.
Frequently asked questions
How do I get into the goblin camp in BG3 without fighting the outer sentries?
Approach the gate as a non-hostile party. The goblin sentries let the player in if the player passes a deception check, mentions a password heard in the Blighted Village, or simply looks weak enough that the sentries assume the party is tribute. Failing the check or attacking the sentries immediately pulls the watchtower reinforcement, so a stealthy approach or a talking approach is the cleanest way to enter the camp as intended.
Do I have to do all three goblin camp rituals in BG3?
No. The three rituals are designed as parallel completions, and the player only needs to finish one to move the Act 1 grove conflict forward. Completing all three is the most rewarding path, but a player who commits to the Minthara path can still finish Act 1 by siding with the goblin raid, while a player who commits to Dror can still finish Act 1 by exposing the raid and rescuing the grove.
What level should my party be before entering the goblin camp?
Most guides recommend party level 3 to 4 for the goblin camp. The camp’s leaders and shaman casters are tuned around the assumption that the player has at least one crowd control spell and one ranged damage option. Under-level 3 parties can clear the camp but will struggle in the throne room and the temple, which are the two encounters with the most level scaling.
Can I recruit Minthara without raiding the druid grove?
Yes, but only with a careful sequence. The usual approach is to knock Minthara out in the grove raid rather than kill her, then use a specific dialogue path to recruit her later in Act 2 or Act 3. The path is version-sensitive and the goblin camp BG3 dialogue tree has changed between patches, so a recent save before the raid is the safest way to test it.
Is the goblin camp BG3 worth doing on every playthrough?
It depends on the goal. The camp is mandatory in the sense that the player has to resolve the grove conflict, and the camp is the hub for two of the three possible resolutions. If the player wants a different Act 1 ending on a second run, the camp is the place that produces it. If the player only plans one run, the camp still has unique rewards, so it is worth a single visit even on a no-combat-style run.
Where is the entrance to the Underdark from the goblin camp?
The Underdark entrance is in the camp’s inner temple, behind a locked door that Priestess Gut guards. The player can also reach the Underdark from the Blighted Village well or from the Whispering Depths beneath the goblin shrine. The temple path is the only one that ties into the goblin camp’s ritual content.
Can I save the tiefling prisoners in the camp without alerting the goblins?
Yes, by using a rogue’s pickpocket on the cage keys or by killing Klagga the quartermaster before the alarm spreads. A successful pickpocket lets the player free the prisoners quietly. Killing Klagga triggers a partial alarm but still allows the prisoners to escape. Both options affect the goblin camp BG3 reputation outcomes for Dror and Minthara.
What happens if I kill Dror Ragzlin before speaking to him?
Killing Dror before dialogue closes the warrior ritual path and removes the spiked club reward, but it does not block the other two rituals. The camp’s quest state is designed so that each leader can be removed independently, which is what makes the camp a good example of layered quest design. A player who only wants Minthara’s path can ignore Dror entirely, though the throne room fight becomes harder without a dialogue resolution.
Is the goblin camp the same in Honour Mode and lower difficulties?
The map and dialogue are the same, but Honour Mode adjusts the enemy stat blocks, removes a few of the camp’s automatic checkpoints, and tightens the AI on the goblin shamans. The goblin camp BG3 Honour Mode path is also where the legendary actions on Dror and Gut become a real threat, so a party build that works on Balanced may need a dedicated crowd control setup for Honour Mode.
How does the goblin camp’s design compare to other Act 1 hubs?
Compared to the druid grove and the Blighted Village, the goblin camp carries more dialogue-gated content and more vertical combat space. The grove is built around persuasion and stealth, the village is built around a single fight and a puzzle, and the camp is built around a small social system with three competing quest pillars. That progression is part of why the goblin camp BG3 encounter reads as a design turning point rather than as a third instance of the same hub template.



Leave a Reply